Monday, July 30, 2012

Purslane Quesadilla


If you have ever ogled someone’s jade plant, and imagined yanking off one of those succulently fleshy leaves and popping it in your mouth—have I got a weed wild edible for you! It’s purslane, and it may well be growing in your garden, yard, or sidewalk cracks. If you think it might be, just do a Google image search to check—it’s pretty distinctive looking. I have a lovely patch that recurs by our back steps, and the children call purslane “Chapter 1” in the Crazy Shit Our Mother Ate memoir they’re plotting.

I must add here that the person who taught me to eat purslane in the first place was my own mother. So maybe Volume II can be Crazy Shit Our Grandma Ate.
Pretty much every morning in the months of July and August, I dart out the back door to pick a handful for my breakfast quesadilla, and I love it. It’s crunchy and lemony and slippery, like a cross between okra and sorrel and the way you think it would be to bite into one of those juicy-looking seaweed pods you see washed up on the shore. (“Chapter 2” of the kids’ book is Seaweed, which I am always surreptitiously nibbling at the beach—especially those chartreuse ruffles that look like how you would draw lettuce if you were tripping.) 
Birdy with lettuce seaweed, circa 2007. Picture courtesy of Uncle Barbara, aka Michael's lovely step-mother.
I just asked Birdy to describe purslane, and the adjectives she picked were slimy and leafy. Hm. Wikipedia describes it as mucilaginous. Sure. That—and more! Because you should know this: purslane is a superfood. One day, everyone’s going to be eating it for its insane concentrations of Omega 3, vitamins, and minerals—and you’re going to say you knew it when.

There might be a moment when you notice that your quesadilla is covered in little black specks, and you'll think Fuck, it's caterpillar shit. But it's not. It's purslane seeds, and they're really good for you.
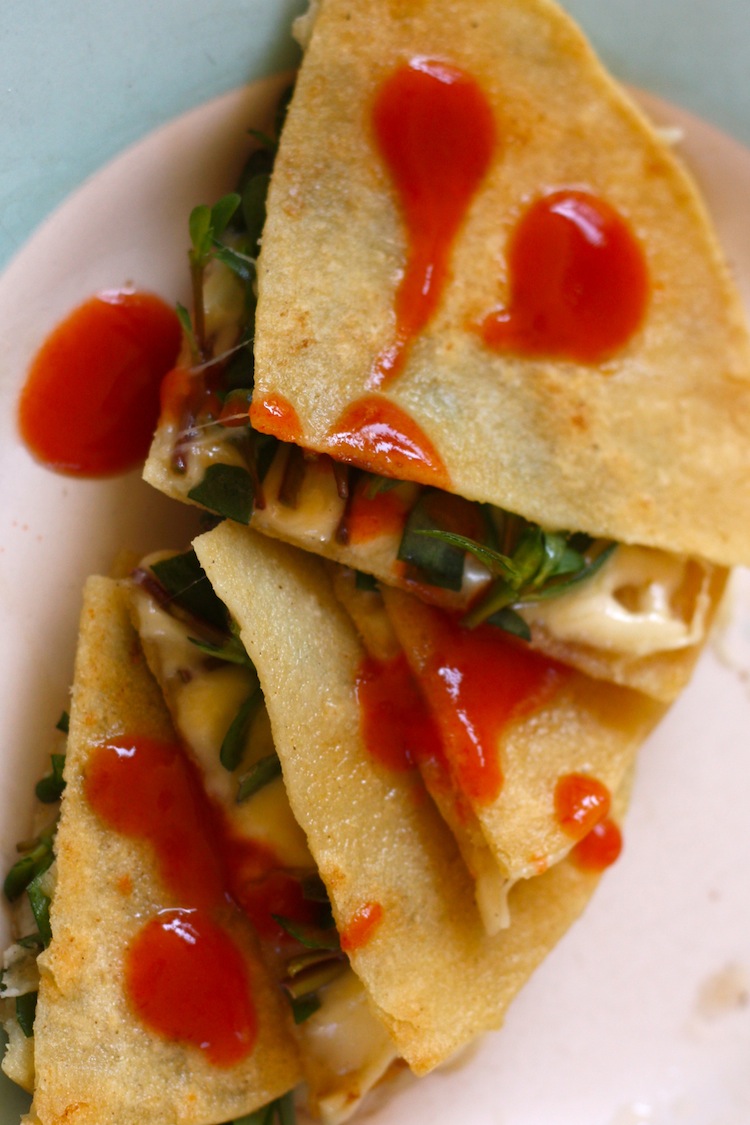
This quesadilla is my very favorite way to eat it, although I would like to try putting purslane in potato salad, which I think would be fantastic, and cooking it with pintos, which I’ve heard is good. I have tried pickling it, which was oddly disappointing, and when it’s very large and the stems get thick, I stir-fry it, which is good. It is surprisingly bad in smoothies. A friend in California once made me a fattoush salad of purslane, torn pita bread, and tomatoes, and it was once of the best things I ever tasted. Birdy eats lots of it plain, while she stands contemplatively by the back steps. And we just ordered a lovely salad from the Sunbird fish taco truck in Wellfleet, and I got a high-five for identifying the purslane leaves. Rock on, wild things.


Purslane Quesadilla
Makes 1

I know you don’t need me to tell you how to make a quesadilla. And yet it’s funny that I never have, given that we eat them morning, noon, and night. When purslane is not in season, I use kale, spinach, dandelion greens, or slivered cabbage.

Butter
2 corn tortillas
Sliced or grated cheese (Monterey Jack, pepper Jack, or cheddar)
1 handful purslane stems and leaves, rinsed if necessary
Hot sauce, etc. for topping

Heat a little butter in a small pan over medium heat. When it is hot, lay a tortilla in a pan, then top it with cheese, then lay another tortilla over the top. Now watch. At a certain point, not only will the bottom tortilla be beautifully golden-brown, but you will see the whole little package steam and swell, which means that it will be crisp and puffy, rather than dry and leathery. Flip it and cook the bottom side until brown.

Remove the quesadilla to a plate, open it up to add the purslane and hot sauce, then sandwich it all back together and cut in quarters. Divine.


Sunday, July 22, 2012

waterlogged


Great Pond, Race Point, Herring Cove, Head of the Meadow, Marconi, synchronized swimming, cans of lemon-lime seltzer, striped bass crudo with "jalapeno water." Birdy's splash-ball question at the pond: "Can you play monkey in the middle, you know, professionally?" Cape Cod.

Hope you're all cool, damp, and thriving.

xo

Saturday, July 14, 2012

Herbed Goat Cheese / car trips


I know that sprinkling goat cheese with herbs and oil does not make me a rocket scientist. But this is in such heavy rotation for us that I am sharing it anyways.
Bread and Cheese: brought to you by the Pizza Toast People.
When Michael is working, this is what the kids and I eat for dinner (when what we're eating for dinner isn't fro-yo). We think it's goat-rific! He thinks it's goat-errible. Goat cheese tastes to him like a log of sludge that's been left to marinate on the floor of a barn where various farm animals took turns pissing on it. Fair enough. But to us it tastes like an edible lace valentine that a friendly goat has sealed with a kiss. During the school year, it's what I pack the kids for lunch as often as not. On day 1, I send a piece like this in a short mason jar. And then on day 2, if we haven't finished it, I mash it all up with a fork (picture Boursin) and send a little container of it for spreading. It's great both ways. It's also grand for picnics, for company, and for potlucks.


We get these lovely ginormous Vermont Butter and Cheese logs (log!) from Trader Joe's, where they are $4.99. Just slice it up into rounds. Or thick oblongs. Or whatever.

I typically use a knife, which makes for messy slices, but since I knew you were coming over, I sliced the cheese with dental floss, which worked like magic.

Then smear each slice with a little mashed garlic (you can just stir it into the oil, if you prefer), and sprinkle them with all grated lemon zest, freshly ground black pepper, and herbs. 


Here, I'm using a mix of lemon thyme, marjoram, and rosemary. But you really can't go wrong, herb-wise. Lavender makes it very fancy-seeming, although my kids call that "bubble bath cheese," and not in a good way. Juicy leaves such as mint and basil will go dark and unappealing quickly, so leave them whole or plan to eat it all up immediately. But parsley does well, and all the woody ones too. Then you just glug some olive oil over all of it. Plenty of good-tasting olive oil, because now is not the time to get parsimonious.


If you're not eating this immediately--and it will taste better if you don't--then cover it and leave it at room temperature up to a few hours, or refrigerate it if you must, for as long as you like. Then grab your handy loaf.

Now I'm just showing off.
And feed your people.


A bowlful of cherries or sugar snap peas makes the perfect summer side dish for a perfectly balanced meal.

*

We are heading out to Cape Cod today, and I wanted to leave you with another audio book recommendation: The Star of Kazan, by Eva Ibbotson. We are halfway through it, and just completely on the edge of our seats: it's funny and heartbreaking and suspenseful, but you have to make sure that Patricia Conolly is reading it, because she's just crisply perfect. We also listened to the end of the delightfully vast James Herriot series. I know I always say this, but seriously, if you're looking for a book on tape that everyone will enjoy, he's the man: if there's anything more entertaining than a handsome young English vet up to his armpit in cow vagina, I'd love to know about it.

Have a great week, my lovelies.

Monday, July 09, 2012

Black Cherry Jam


Hello, dear ones! We’ve been all over New England, visiting friends in New Hampshire, Maine, and Rhode Island. Oh, vacation! I love it. Motor boats, sailboats, and ferries. Lakes, oceans, and salt ponds. Lobster, lobster, and ice cream. Heaven on earth. Lobster.


 We came home to so much laundry that I don’t understand how it even fit in the car.

And also, to cherries, so good and so cheap that I had to make jam even before we’d finished unpacking. I’ve never made cherry jam before, even though it’s one of my favorites, because I can’t get sour cherries, and I’ve never really seen the point of Bing cherry jam. But I was wrong. 

My goal every summer is to make enough jam to last us all year. Peach, strawberry, grape, raspberry, plus some weird ones like autumn olive or ornamental quince jelly. And now: cherry! Elegant labels, no?
Because this jam? It is black and sweet, tart and bitter, fruity and almondy and gorgeous. I recommend bothering with the pit kernels, because that’s what will give the jam its incomparable almond flavor, and because it’s fun to crack the pits with a hammer—but if you really have too much laundry, then try adding a half teaspoon of almond extract. And if canning the jam just gives you a total heart attack, make freezer jam instead. Peach here, any-berry here. Those are especially good, because the fruit tastes better if you cook and sweeten it less than you need to for canning. But cherries and grapes lend themselves to long cooking and lots of sugar, I think.

Ours came out a tiny bit runny, which is perfect because we mostly eat it on waffles and pancakes and ice cream.
Black Cherry Jam
Makes 5-6 half-pint jars
Takes forever

Adapted from the beautiful, canningly pornographic The Blue Chair Jam Cookbook. This recipe is crazy involved, but the kids wandered in to help, and we really enjoyed ourselves. I can’t say I fully understand the whole rigmarole with the cooking of some cherries separately and straining out their syrup, but since I’d never made cherry jam before, and since I wasn’t in a hurry and the only extra washing-up it added was a sieve, I did it. I used the spent cherries to make dark and wonderful popsicles, which I recommend.

3 pounds plus 1 pound pitted cherries, pits reserved
1 ¾ pounds (3 ½ cups) plus 7 ounces (1 cup) white sugar
¼ cup water
5 ¾ ounces (2/3 cup) freshly squeezed lemon juice (Optional: stir 2 tablespoons maraschino liqueur into the lemon juice.)

Figure out how you’re going to deal with your jars and lids and set up a clean canning station with a clean dishtowel, a paper towel for wiping jar rims, a clean funnel, and a clean ladle or measuring cup for transferring jam to jars. I sterilize my jars either in the dish washer (leave them in there and pull them out, still hot, when the jam is ready to can) or in a large pot of boiling water for half an hour. However, Rachel Saunders has this really cool method of sterilizing her jars in a hot oven: Place the perfectly clean jars and clean, unused lids on a baking sheet in a preheated 250 oven and leave them for 30 minutes. Remove them when you need them. (If they’re too hot—which you’ll know because the jam will bubble or boil in the jar, let the cool for a few moments before filling.) After you have filled them, leaving a quarter inch of head room wipe the rims with a clean, damp cloth, put the lids on and screw on the rims until just tight, then replace the jars in the oven for 15 minutes to ensure that they’re sterilized. Put them on a cooling rack; don’t jiggle them around; they’ll seal as they cool. If they don’t seal, freeze the jam or store it in the fridge and eat it. Now, that explained, I have never tried this method. I use boiling-hot jars which I pull out one at a time for the pot of boiling water and dry briefly with a super clean dish towel. I fill a jar with the funnel and wipe its rim with the damp paper towel, then I put on the lid (which I put in the boiling water for just a minute, and which I fish out with a magnet stuck to the bottom of a ladle) and screw on the rim. IS THIS TOO SCARY? First of all, it’s not. But second of all, feel free to scoop the jam into clean jars, leaving plenty of headroom, and then freeze it. {note:  You will still need to follow some other instructions, as I do not take this to be a thorough explanation of the canning process, and I don't want you to somehow manage to be the only person on earth to ever get botulism from jam. Also, just because my English mother doesn't process her canned jam doesn't mean you don't have to.}

Now make the actual jam. Put a handful of cherry pits inside a clean dish towel on the floor. Use a dish towel you’re happy to stain! Now tap them gently with a hammer, through the cloth, until you hear them crack. This is oddly satisfying. Open up the dish towel and remove the plump almond-like kernel from inside each pit and reserve; discard any shriveled ones and shake out the shell fragments. Do this in batches until you have 1 ½ tablespoons of kernels, then tie them up in a small piece of cheesecloth or put them in a fine-mesh stainless-steel tea strainer and set aside. (Note: in lieu of all this pit-cracking hoo-ha, you could stir a half a teaspoon of almond extract into the finished jam after you take it off the heat.)

Put a saucer with five metal teaspoons on flat place inside your freezer for testing the jam later.

Combine 3 pounds of the cherries with the larger amount of sugar in a large heatproof mixing bowl.

Put the remaining cherries and sugar, along with the water, in a very large heavy-bottomed non-reactive pot. It will boil up, so the pot really does need to be larger than you might think. Cook over low heat, stirring constantly with a heatproof rubber spatula (or a wooden spoon!) and inching the heat gradually up to medium, until the mixture boils, then cook 7 minutes more until the liquid has become thick and syrupy and the cherries look greatly the worse for wear. Immediately pour the cherries through a metal strainer so that the syrup drains into the bowl with the raw cherries. Press down on the cooked fruit to extract all of the juice. “Discard the cooked cherries” if you are clinically insane!  Otherwise, blend them with 1 cup of limeade, then freeze to make popsicles.

Add half the lemon juice to the cherry mixture, stir well, then scrape it all back into your pot, and add the pit-kernel bag.

Bring the mixture to a boil over medium heat, gradually increasing the heat to high. Boil rapidly, stirring every minute or two, for “10 to 15 minutes.” How will you know which? I didn’t, so I went for 12 ½ minutes, sensible girl that I am. Monitor the heat closely as you stir, and turn it down a little if the jam feels like it’s sticking. Between stirrings, use a stainless-steel spoon to skim the foam carefully off the top of the mixture. Again, maybe I don’t get out enough, but I find this oddly satisfying. Also, I always eat all the foam.

After 10-15 minutes, turn the heat off and let the mixture rest for a minute without stirring. Scrape all the rest of the foam off of it, then stir in the rest of the lemon juice.

Return the jam to medium-high heat and continue to cook, stirring frequently. Lower the heat as needed to prevent scorching. After 5 more minutes, you should start to test the jam for doneness. To do this, turn the heat off and fill one of your frozen teaspoons half full of jam liquid. Return it to the freezer for 3 minutes, then test it: tilt the spoon vertically to see whether the jam runs; if it is reluctant to run, then it is done. If it runs very quickly, cook it for another few minutes, stirring, then test again. Repeat until it’s done (mine took another 5 minutes), then turn off the heat and remove the pit-kernel bag.

Pour the jam into sterilized jars and process as above and according to the manufacturer’s directions.

We still have black fingernails from the cherry juice.
Pit Boss Birdy. Smashing pits is so much fun! Better even than punching an inflated clown.
The pit kernels in a bag. Please don't mention in the comments about how they have cyanide in them and we're all going to die.
Lemon juice.
Boiling jam, pre scum-skimming.
Our very huge canning pot.
Spoons in the freezer.

Friday, July 06, 2012

Panzanella


It is the cusp season. Our countertops sound the alarm of tomatoes: "They're red! They're ripe! Something needs to happen with them! The fruit flies are coming!"; the summer perfume of basil lingers in the kitchen; our freezer and shelves are filling with salsa, sauce, and jam; our Anni housemate is like the tomatillos overflowing their quart baskets, each one so ripely full that it's splitting its husk. Her baby is due this week, and she is like an icon of the season, drifting through the house with her enormous peach of a belly--part now, part future.

And that's what it's like, because it's fall too, now. We drive past field after field embroidered with rows of butternut squash, and Michael, not a lover of squash, is incredulous. "Do they feed those to the cattle or something?" He is serious. "I mean, surely it's not people who are eating all of those." Oh, but it is! Soon it will be us too, with our warming and warm-hued soups, with our candles on the table as the evenings grow short. Birdy and I are reading Little House on the Praire, which always feels like the perfect Autumn book, since they are always harvesting this and that before some bad thing happens ("Is Pa still making bullets?" Michael asks, passing through the room. It is true that Pa melts many spoonfuls of pewter by the fire every night.) Here in the modern world, we go to bed with the ceiling fans spinning away the last of the muggy air, and then wake chilly-nosed under our down comforters. It is neither one thing nor yet the other.

It is also, if I may speak less romantically for a moment, allergy season. Ragweed? Sunflowers? Whatever it is, it's dreadful. Ben, practicing his recorder on my bed last night, stopped and sniffed into its mouthpiece with that delighted revulsion that comes from smelling the strange accumulation of your own spit. "Smell my recorder hole!" he said, holding it out to me. "Weirdly, it smells like lobster!" But I couldn't. Because I had a Kleenex wedged into each nostril. I want him to remember me as beautiful and elegant, canning tomatoes in the kitchen with my hair up. Instead of sprawled out beside him on the bed and stuffed with tissues, rasping and hawking to try and scratch my allergic throat.

Still, I did make a beautiful dinner in an effort to get as many tomatoes off of the counter and into our bodies as was possible in a single sitting. I go through tomato-season phases where I make this Italian bread salad nearly every day--I love it so much. The bread gets all soggy and addictively garlicky, and the basil is so bright and pungent, and the tomatoes are just perfect in every way. Unless you're Ben, who will eat this salad, bless him, but only after he picks out the tomatoes. Make it because you've got a baguette staling on your countertop or because you've got tomatoes ripening everywhere or because it will be just such a perfect summer-fall meal. Which it is. You'll see.

Panzanella
Serves 4
Active time: 10 minutes; total time: 40 minutes

Crusty bread, tomatoes, basil, and vinaigrette are constants here, and then there are the variables: a bit of chopped red onion and white beans (both of which I add here) or cucumbers or fresh mozzarella, which is my favorite thing to add, but which I was too cheap to buy yesterday. Still, the beans make it a complete meal, albeit a nice, light one.

Part of a large crusty baguette or other good loaf of bread, cut into 3/4-inch cubes (enough to make 4-6 cups) 

2 pounds perfectly ripe tomatoes (about 4 to 6), cored and cut into chunks

1/2 cup basil leaves, stacked and slivered 
1 15-ounce can cannellini beans, drained
1/2 a small red onion, finely chopped
1/4 cup balsamic vinegar

1/2 cup olive oil

1 large garlic clove, pressed

1 teaspoon kosher salt (or half as much table salt)

Put bread, tomatoes, basil, beans, and onion into a large bowl. Whisk together remaining ingredients. Pour enough dressing over the salad to moisten it, tossing it together with your hands, then let it sit for around half an hour to get soggy. Taste, and add more dressing if it needs it (although the tomatoes will have given off a lot of juice by now, so it may simply need a bit of salt.

Gingery Napa Slaw


It's one of those days when this column is unfolding in real time. Super-real time. Surreal time? Because even as I'm writing this, my children are sitting at the table, munching through giant bowls of this salad for lunch. It is hot-hot-hot today, and the salad is cool and crunchy, tart and sweet, and they are loving it. "Can you make this again soon?" Birdy asked, and I said, "I think there'll be plenty leftover for dinner," instead of saying, "Um, I just made it last night too." But I did. We were heading out to a July-Fourth potluck, and I tossed together a huge bowl of this slaw, and it was so utterly good and so utterly gone that I had to make it again pronto. Do you recognize the dressing? It's the same as the soba noodle bowl dressing from last week. I am kind of obsessed with it. So far, it appears to be good on just about everything: on an arugula salad, on brown rice, as a dip for sugar snap peas, as a marinade for tofu. . . I can't get enough.

And then the slaw is just crazy good. It's so addictive that if you bring it to a potluck, nobody will say, "Cabbage? Well isn't that just the cheapest thing!" Or "Yes, we also got a giant head of Napa from our farm share but were too generous to try and foist it off as an actual potluck dish." One friend, for instance, brought a trayful of lovely Vietnamese summer rolls that were stuffed with herbs and noodles and wrapped in translucent rice paper, each one like a perfectly wrapped present, with two dipping sauces {drool}. There were dishes with avocadoes, with artichoke hearts, with berries, with sunny sweet corn sliced from the cob. And me? I cut up a gimongous head of cabbage, dressed it, tossed it with some toasted almonds, and it was like I'd carried the torah around for everyone to kiss (bar mitzvah joke). Everybody loved it. So, if you need a getting-away-with-something dish in your repertoire, I really recommend this one. Plus, there's something about the balance of sweet, tangy, and salty, something about the Asian flavors or the crunch slivers of almonds, that makes it so that kids love this coleslaw, even if the mayonnaise kind leaves them cold (even as I say this, I am thinking of all the mayonnaisey cold slaws I have known and loved: like that finely-chopped one at KFC, which I haven't eaten in the years since swearing off of fast food but which I would very nearly sell my soul for). I don't always understand children, but they do like this, and I am learning to let the mystery be.

Gingery Napa Slaw
Serves 8
Total time: 20 minutes

I love Napa cabbage--the way it simultaneously wilts and stays crunchy in a dish like this. Also, we have tons of it. But I'm guessing a regular head--or half head--of green cabbage would work too, though I might let it sit a bit before serving. You will have dressing left over, and you will not be sorry. Oh, also: feel free to use roasted salted peanuts instead of the home-fried almonds. I go back and forth.

2/3 cup peanut or vegetable oil, divided use
3 fat scallions, white and healthy green, sliced (around 1/2 cup)
1/2 cup sliced almonds
1 teaspoon finely chopped fresh ginger
1 1/2 teaspoons kosher salt (or half as much table salt)
2 teaspoons sugar
1 teaspoon sesame oil
1/3 cup balsamic vinegar
1 large head of Napa cabbage, slivered (I just cut through the whole head)

Heat a tablespoon of the oil in a small pan over medium-low heat and sauté the scallions until wilted and fragrant, around 3 or 4 minutes. In a food processor or with a hand blender, whir together the scallions with the remaining ingredients until the dressing is thick and emulsified. Taste for salt, sugar, acid, and overall balance, and re-season as necessary.

In the unwashed scallion pan over medium heat, fry the almonds until golden, around 2-3 minutes. Remove to a small bowl so they don't burn in the hot pan. (Or go ahead and burn them!)

In a large bowl, toss the cabbage with half the dressing and taste, then add more dressing if the slaw needs it, tossing and tasting as you go. Top with the almonds and serve.